Posts

Showing posts from 2016

Christmas Nails - Part 2

Image
Happy Christmas Eve Everyone. Yesterday I posted Part 1 of my Christmas Day mani and today I have the rest of it. I decided I wanted to create some Icy Blue nails that resemble luxury wrapping paper. All the products I used for the rest of this mani were purchased from  Rainbow Connection  and some are still available. I started by painting 2 coats of Cirque Colours Idyllic on my ring and middle fingers and Reflektor on my index and thumb (Reflektor is no longer available) These colours were perfect for my icy look and definitely look luxurious on the nail - they dry quite quickly too. Once dry I put some latex around my middle and index ready to do a sponged gradient. You can get Zap from RC but I have a big bottle from Ebay which I use. Let the latex dry. *Please don't use liquid latex if you have a latex allergy - you can use tape around the nail instead* Using a cosmetic sponge (I have a bag from the pound shop) apply 2 stripes of your polishes onto the spon...

Christmas Nails - Part 1

Image
It's nearly Christmas!!!!! I have a couple of posts today and tomorrow and then I will be back in the new year! As it is nearly Christmas day I decided I needed to do something special on my nails, I have been planning this for a couple of weeks now and knew I wanted sparkle and bling...so I decided to do a Blingky - a blinged up pinky! For this I placed my 1st order with Crystal Parade who sell lots of sparkly goodies for all sorts of things including nail art. I order a small selection of Preciosa Crystals (because 1 bag would get lonely in the post!) The set I have used for this mani is the Crystal/Pearl mix of 200 in Winter Blues - this set contained a mix of Preciosa flatback crystals and pearls in sizes ranging from ss5 - ss12, There are 160 crystals and 40 pearls. The 1st thing I needed to do was my infills. I soaked my acrylics off several weeks ago and I am now try Hard Gel extensions using the Builder in a Bottle from The Gel Bottle Inc and I have use...

Marianne Nails Plate 1 Swatches and Review

Image
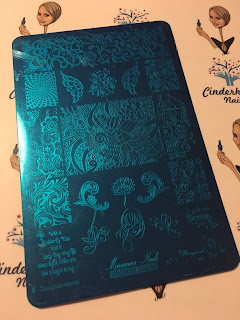
Hi Everyone, Those of you who are regular followers of me on social media will know that I recently took a break to focus on my health - this included blogging but I have been starting to miss it all so I am easing myself back. The lovely Annette from  Rainbow Connection  recently sent me a plate from Marianne Nails to review. This is a new brand to me and to RC so I was very excited to give it a try and test it out for my fellow RC stamping fans. The plate I was sent was Plate 1 and its has some beautiful floral images on it. My 1st impression of this plate was that it's great for any length nails as there are small individual images, mid-long full nail images and 3 extra large images for really long nails. In total 23 images. I also loved that there are some mirror images to create designs across the nails. So when you get a new plate the 1st thing you do is take off the blue film and I could tell after that, that this plate is really well etched. Then give the...

Creative Shop Plate 25 Swatches

Image
Happy Sunday Lovelies, I hope you have all had a great weekend. I have some swatches today of another Creative Shop Plate the lovely Annette of  Rainbow Connection  sent me. This is plate 25 which is full of tropical/summertime images and my eye was instantly drawn to several of the images. Now I have been stamping for a while now and while I wouldn't say I'm an expert I have tried a lot of brands of plates and stampers and in my opinion Creative Shop are some of the best I have used. When I got my 1st plate I tested it with a range of polishes and stampers and I had perfect results everytime, it is all in a previous post which you can find  here . Here is the plate I am swatching today - These plates have a clear protective film that you need to remove before using. There are 14 images and they are a good size so perfect for my long nails and would work for slightly longer nails too. These plates are really well etched which you can tell from the pick up ...

Sarah R Dotty Mixes Review

Image
Hi Everyone, Hope you are having a good week. Today on my blog I have a review of some Dotty Glitter Mixes I was sent by the lovely Sarah R aka The Real Mrs Grey. Sarah has her own Online shop where she sells stamping and nail art supplies and has recently added her own glitter mixes for use with Gel and Acrylic and I was very lucky to be sent the set for review - Thank you Sarah There are 12 mixes in the set and are £2.75 each. These are great value for money because they are full to the brim! I ended up with 101 Dalmations all over my bed...Twice!! I decided to do a full nail swatch of each and then incorporate each one in some Acrylic Nail art. Here are the 12 swatches - As you can see each mix is completely different so there is something for everyone. Everytime I opened a new one I had a new favourite! For these swatches I mixed the 11 mixes with clear acrylic - When mixing I use the ratio 3 parts acrylic to 1 part glitter. The only one I didn't mix was the silve...

Semilac Hybrid Gel Polish Swatches and Review

Image
Hi Everyone, A few weeks ago I was sent some gel polishes from Semilac UK to swatch and review, unfortunately my current illness hasn't been playing ball so this review has been a bit delayed but I wanted to give them a wear test before posting anything as I hadn't tried them before. Semilac is a brand from Poland which has now been launched in the UK and you may know it more from the face of the brand - Amy Childs. The press info I received with my polishes says - 'The highly pigmented nature of the range creates intense colour that means often one coat of Semilac polish is required to last up to four weeks. Semilac also offers a high building formula used to extend the nail plate by up to 5mm.' 'Competitively priced at £8 per bottle, Semilac's range is a highly durable, long lasting and striking nail range that rivals the top gel nail polish brands currently on the market' So after reading all of this I was keen to get these on my nails. I was...

Reverse Stamping Tutorial

Image
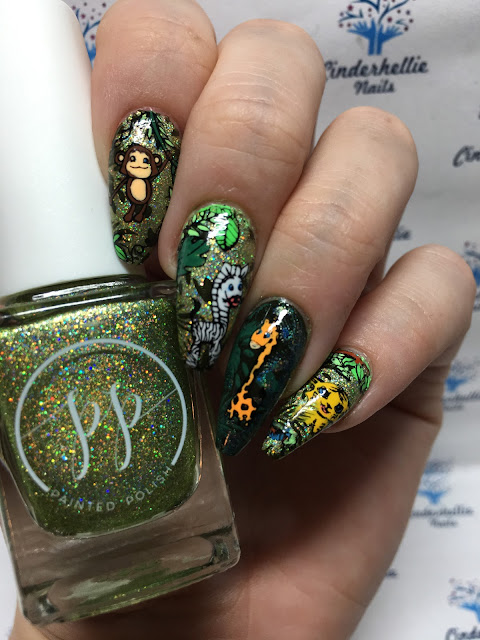
Hi Everyone, I have another tutorial post for you today - last week I did a step by step for making decals and today I'm going to do a step by step for reverse stamping. For those of you who are unsure reverse stamping is when you colour in an image on the stamper head and then stamp onto the nail, you can also peel it off and apply like a decal if you prefer. I run a weekly challenge in a group on Facebook and last week the theme was Welcome to the Jungle which I had the perfect stamping plate for and using the reverse stamping method I created these. So here is how I created them -  You will notice from the step by step pictures there is a change to the final mani and I will explain why at the end! I started with 2 coats of Painted Polish 'Charmed at the Chateau and top coated it. Using Painted Polish Midnight Mischief (In my opinion this is the best stamping/one coater black around) I picked up my chosen images on separate stampers - I only have 3 clear whi...