Sugar Bubbles SB049 Swatches and Decal Tutorial
Hi Lovelies,
I hope you are having a good week?
I have another stamping swatch post for you today plus a tutorial for making your own decals.
Last week I purchased a new Sugar Bubbles stamping plate from Rainbow Connection because the minute I saw it I knew I needed it.
This plate is full of 80s and 90s cartoon characters and as I grew up watching some of these there was no way I could not get this.
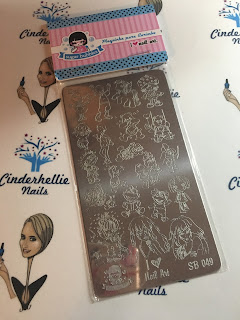
The characters include Care Bears, My Little Pony, Doug, Rugrats and lots more and there is so much detail in these images.
I like the Sugar Bubbles plates because they are so detailed and well etched but I do find with some of the finer lines cotton wool gets caught so I just run over with my finger to clean it.
I always use a quick, firm scrape with these plates and I find with my trusty Sticky Fab ur Nails stamper I always get great results.
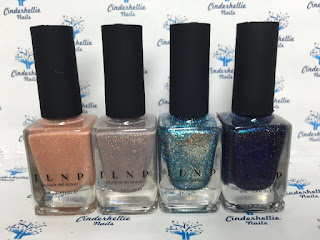
I did these swatches on swatch sticks and for anyone who wishes to know the background polishes are all 6 from the Bundle Monster Gel Cali Dreamin' Collection which I got from RC (I think 3 are still available)
 So those are all my swatches and as you can see the images are so clear, crisp and intricate - I definitely recommend these plates they are great and I especially love the images on this plate - they are definitely childhood memories for me.
 I used my Fab ur Nails Jumbo Squishy Stamper, Messy Mansion Scraper and Painted Polish Midnight Mischief for these swatches.
Now any beady eyed readers will probably have noticed there are 2 images missing from those swatches. Well when I saw the plate I knew straight away that it would be perfect for decal making so I chose my 2 favorites to make decals with and I have a step by step for you.
I am using my UberMat which I got last year from She Sells Seashells although they no longer stock Uberchic they do still have a few bits available including the mat. You can also get all the Uberchic range from Nail Art UK.
I start by painting over 2 of the nails with a clear polish/top or base coat. I find it doesn't work well with fast drying ones or really thick ones. I have been using this The Edge top coat for my decals and its flexible so works perfectly. You then need to let it dry completely.

Once the clear coat is completely dry I can stamp my chosen images. I like to use a clear stamper for this to ensure the full image is on the clear because there is nothing worse than lining up wrong and having half the image miss! At least with a clear stamper you can see what your doing! I used this small clear fab ur nails stamper and Midnight Mischief for this.

Once the stamping is dry (doesn't take long) it's the fun part and you get to colour in. I like to use stamping polishes when I make decals because the bold colours stand out and because they are 1 coaters they give you a full block colour. They also dry really fast. I use small dotting tools/toothpicks for small areas and larger dotting tools for bigger areas, I also use fine brushes sometimes.
I start with small details because you can then go right over the image for any main colours and it's not so fiddly.
You can decant a small blob on your mat and paint from there.
Here are my coloured in images - obviously this is the back so looks a bit messy but all will be revealed!!
Then I top coat again and leave it to fully dry.

Once the images are dry carefully lift a corner using tweezers and gently lift the entire image off of the mat.
I then very carefully cut around the image to get rid of any excess. Remember these are really fragile so do this bit carefully because the last thing you want is to rip all your hard work.
You don't need to do this step I just find it easier to attach to the nail without all the unneeded excess.

And here are the finished decals - I absolutely adore them and was so happy with how perfect they looked - That is my childhood in 2 handmade nail decals!

Next I top coat my nails (swatch sticks in this tutorial) again I used my The Edge top coat because it gives you a bit of time to work so still recommend a standard top coat here and not a fast drying - you could use a clear polish too.
Once the polish is tacky (Do Not let it dry completely) you can apply the decal and gently press it down to ensure its flat and secure. I do recommend doing this gently because there is still a danger of moving and ripping the decal.
If you are doing this on your own nail once it is dry you can use a clean up brush and acetone to remove any excess decal from around the nail - any excess top coat dissolves with the acetone. If you have any excess over the free edge you can cut this with scissors, I then push the side of my brush up to the free edge to remove the rest of the excess but do this carefully so you don't start removing anymore polish.

Finally use your favourite top coat (HK Girl for me) to topcoat the entire nail and make sure you cap the free edge too.
And here are my finished nails.

Here are all the images together.

I hope you are having a good week?
I have another stamping swatch post for you today plus a tutorial for making your own decals.
Last week I purchased a new Sugar Bubbles stamping plate from Rainbow Connection because the minute I saw it I knew I needed it.
This plate is full of 80s and 90s cartoon characters and as I grew up watching some of these there was no way I could not get this.

The characters include Care Bears, My Little Pony, Doug, Rugrats and lots more and there is so much detail in these images.
I like the Sugar Bubbles plates because they are so detailed and well etched but I do find with some of the finer lines cotton wool gets caught so I just run over with my finger to clean it.
I always use a quick, firm scrape with these plates and I find with my trusty Sticky Fab ur Nails stamper I always get great results.
I did these swatches on swatch sticks and for anyone who wishes to know the background polishes are all 6 from the Bundle Monster Gel Cali Dreamin' Collection which I got from RC (I think 3 are still available)

 I used my Fab ur Nails Jumbo Squishy Stamper, Messy Mansion Scraper and Painted Polish Midnight Mischief for these swatches.
Now any beady eyed readers will probably have noticed there are 2 images missing from those swatches. Well when I saw the plate I knew straight away that it would be perfect for decal making so I chose my 2 favorites to make decals with and I have a step by step for you.
I am using my UberMat which I got last year from She Sells Seashells although they no longer stock Uberchic they do still have a few bits available including the mat. You can also get all the Uberchic range from Nail Art UK.
How To make Decals
I start by painting over 2 of the nails with a clear polish/top or base coat. I find it doesn't work well with fast drying ones or really thick ones. I have been using this The Edge top coat for my decals and its flexible so works perfectly. You then need to let it dry completely.

Once the clear coat is completely dry I can stamp my chosen images. I like to use a clear stamper for this to ensure the full image is on the clear because there is nothing worse than lining up wrong and having half the image miss! At least with a clear stamper you can see what your doing! I used this small clear fab ur nails stamper and Midnight Mischief for this.

Once the stamping is dry (doesn't take long) it's the fun part and you get to colour in. I like to use stamping polishes when I make decals because the bold colours stand out and because they are 1 coaters they give you a full block colour. They also dry really fast. I use small dotting tools/toothpicks for small areas and larger dotting tools for bigger areas, I also use fine brushes sometimes.
I start with small details because you can then go right over the image for any main colours and it's not so fiddly.
You can decant a small blob on your mat and paint from there.
Here are my coloured in images - obviously this is the back so looks a bit messy but all will be revealed!!
Then I top coat again and leave it to fully dry.

Once the images are dry carefully lift a corner using tweezers and gently lift the entire image off of the mat.
I then very carefully cut around the image to get rid of any excess. Remember these are really fragile so do this bit carefully because the last thing you want is to rip all your hard work.
You don't need to do this step I just find it easier to attach to the nail without all the unneeded excess.

And here are the finished decals - I absolutely adore them and was so happy with how perfect they looked - That is my childhood in 2 handmade nail decals!

Next I top coat my nails (swatch sticks in this tutorial) again I used my The Edge top coat because it gives you a bit of time to work so still recommend a standard top coat here and not a fast drying - you could use a clear polish too.
Once the polish is tacky (Do Not let it dry completely) you can apply the decal and gently press it down to ensure its flat and secure. I do recommend doing this gently because there is still a danger of moving and ripping the decal.
If you are doing this on your own nail once it is dry you can use a clean up brush and acetone to remove any excess decal from around the nail - any excess top coat dissolves with the acetone. If you have any excess over the free edge you can cut this with scissors, I then push the side of my brush up to the free edge to remove the rest of the excess but do this carefully so you don't start removing anymore polish.

Finally use your favourite top coat (HK Girl for me) to topcoat the entire nail and make sure you cap the free edge too.
And here are my finished nails.

Here are all the images together.

Thank you for taking the time to read this post - I hope it has been helpful.
I would love to know your thoughts on this post or this plate - please leave me any comments below.
Love and Polish
Helen aka Cinderhellie xx


Comments
Post a Comment